Thursday, 15 December 2011

Deck the hall with...


Lindab ducting, fa la la la la, la la la la
And the garage with
Lindab ducting, fa la la la la, la la la la


The grand plan was that Richard would install the ducting over the Christmas holidays, but as the new roof is not on yet, the ducting will have to wait. And Richard will have to console himself by eating, drinking and being merry during the holidays instead.

For something more technical on MVHR units and ducting.... read on


Christmas is coming....

Well, as far as I'm concerned, Christmas has arrived already!

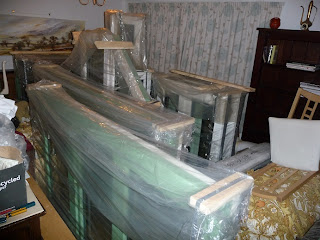
We now have a lorry-load of very beautiful Ecopassiv windows, most of which are being stored in the lounge of our rented house due to lack of suitable storage space on site.


The lead time on making and shipping these high-tech windows was less than we had anticipated. Anyway, it's nice to know they are being kept warm, dry and clean until the builders are ready to install them.

Handy hint - if you do refurbish a house and rent somewhere to live while you are doing it, get somewhere big. The place that we are renting is twice the size of the house we are refurbishing - and the extra space has proved most useful.

The other handy hint - these triple glazed windows are heavy - 40kg per square metre. We had the good fortune to know someone with a handy warehouse and forklift for unloading the windows, and then used their lorry with tail lift to bring the windows to our rented house. Unloading these from a curtain-sider in our fairly narrow street would have been a nightmare.

Saturday, 3 December 2011

1950's houses have cavity walls, right?

Some people have expressed doubts that our 1950's house would be solid wall as houses of this age were supposedly all of cavity wall construction.

Well, 2 layers of brick, but no cavity here...


Ground floor insulation progressing

Steadily, the insulation of the ground floor is progressing.

Conveniently, there was a nice flat layer of concrete about half a metre below the lounge and dining room floor joists. The kitchen floor, on the other hand, needed to be dug out to a depth that would allow for the 300mm slabs of insulation. (It's quite a step up to the back door right now)


Beneath these slabs are downstands of the same insulation around all the walls (as deep as the underlying concrete would allow). These downstands are to minimise the heat lost into the ground through the walls by insulating on both sides of the walls as far down as possible.


And finally, upstands secured and taped, and expanding foam trimmed ready to receive the concrete.


Tuesday, 22 November 2011

Mind the gap!

This is a pretty good mantra when insulating anything, as there should be no gaps.

The concept of insulating the extension and existing ground floor with 300mm sheets of insulation sounds simple enough, but actually doing it is not necessarily quite so straightforward..

To prevent air pockets between the boards, they were placed at least 6mm (but no more than 15mm) apart so that expanding foam could be squirted into the joints. The foam caused the boards to lift up as it expanded, so next job was to place blocks on the top to keep the boards in position.


It might have been easier to use 2 layers of 150mm board instead of the 300mm boards, but any dirt between the first and second layer of insulation could introduce another set of air pockets. Maybe  interlocking insulation boards would have been more user-friendly and give a better end result.

The up-stands and down-stands of insulation are not without their difficulties either. Making a neat job with no gaps is important, and requires some care to keep the insulation layer continuous and tight up against the wall.

Up-stands need to be stuck down (with foam or tape) before the concrete is poured - or you get a cold bridge where concrete fines flow into the gap. Our builder suggested that it might be easier to place longer up-stands and place the main horizontal layer of insulation inside them - a good idea, but the insulation was already on site, and not in the right combination of sizes to fit that approach.

These are the things you only know when you've tried it. The main thing is that the insulation is placed as carefully as possible to avoid gaps, and foamed or taped before concrete is poured on top. It isn't rocket science, but it can be a pain.

Most builders will think this super-insulation lark is completely crackers - it is very over the top by comparison with current building regulations. However, if we want a house that needs virtually no space heating, these details matter.

Monday, 14 November 2011

Preparing the ground floor for insulation

While the builders are getting the extension ready for some serious under-floor insulation, Richard has been busy doing something similar for the lounge.


Step 1 - remove floorboards carefully (for re-use as the attic floor when the loft conversion happens)


Step 2 - Richard admires his handiwork...and notes interesting arrangement of joist ends close to fire place but unsupported!

Step 3 - remove joists (for re-use as raised beds)

While it would be possible to insulate between the existing joists, we're removing them to make way for 300mm of silver EPS with a solid floor on top.

Saturday, 12 November 2011

Windows ready to ship.

We ordered the windows well in advance, knowing that on similar projects the windows have held things up (either due to long lead times or unanticipated delays).

However, we are now in the opposite situation - our passive house suitable windows (EcoPassive from Green Building Store) are almost ready to go, and should be with us in early December. But we've got a few other jobs to complete first, including the small matter of rebuilding the roof!

For a smallish house on a narrow plot, this house has a lot of windows - so now we need to figure out where to put them until each one is ready to install. There is also a lot of work going on both inside and outside the house, so they won't be stored on site, methinks.

Thursday, 10 November 2011

The first energy-efficient product arrives

The extension is starting to grow, and thanks to careful arrangement of the various blocks, we should lose virtually no heat from the extension into the ground via the external walls.

The foundation and first 4 courses of blocks are standard (to get us up to the required height as the house is higher than the garden).

Above that we have a row of highly insulating Marmox Thermoblock (the ones with the stepped edge), and then normal insulating blocks above that.


Tuesday, 8 November 2011

We have a footing!

Happily, the weather has been mild so we now have a footing for the rear extension. By the end of the week we should have some fancy insulating blockwork up to the dpm, rapidly followed by a hefty amount of silver EPS before the solid floor.

The boys liked watching the digger best....


Tuesday, 18 October 2011

Builders start next week!


After what seems like for ever, we have jumped through all the necessary hoops. The fabulously detailed plans and sections drawn up by our architect, Gil Schalom, are receiving the finishing touches. It is very exciting, but quite daunting looking at the sections showing insulation everywhere and the air tightness barrier all round. Hope the builder can follow the plan to the letter – it looks quite complicated.

Right now, our desire to get this house to EnerPHit (passive house refurb) standard seems more attractive than ever. The gas boiler finally gave up altogether last weekend so we have no hot water and just one electric heater. I can’t help wondering if they would have lit the coal fires in the autumn in the 1950’s, or if they were made of sterner stuff.

Happily, the builders will be starting soon and we’ll move to somewhere warmer!

Saturday, 10 September 2011

Pre-refurb temperatures (part 1)

Living in this house before we refurbish it means we can compare energy bills before and after. We also borrowed a number of temperature dataloggers in order to compare how the whole house performs before and after refurbishment.

The chart below shows a 6 month record of daily minimum temperatures (dotted lines) and daily maximum temperatures (solid lines). During winter 2010-2011, the outside temperatures were pretty low.

The boiler in the outhouse had a self-protection mechanism that switched it on at very low temperatures. This meant that the heating was on day and night during very cold weather, with the house thermostat in the hall set at a minimum of 10 degrees C.

Sadly we didn't have any dataloggers in February 2010 when the boiler broke down for 2 weeks leaving us with no heating or hot water. Suffice to say, it was chilly - my children (a baby and a toddler at the time) were dressed in so many layers they could hardly move!


Temperatures in the kitchen are higher than in the hall due to cooking (as you can probably guess from the chart, we were away over Christmas). Neither room ever felt truly comfortable in cold weather due to the temperature fluctuations experienced (across the rooms, and over time). Even with room temperatures generally above 10 degrees C, ice on the inside of some windows was a regular occurrence on cold mornings.

Saturday, 4 June 2011

Planning permission granted and materials agreed, May 2011

We submitted our plans to the planners in early December 2010. All seemed to be going well until, at the very end of the process, an issue was raised with our plans to externally insulate and render.

In the end, the planners have allowed us to render the back and side walls, but we had to agree to brick slips on most of the front elevation. After looking at some rather hefty brick slips, we finally found some slim, light-weight ones that we were happy with. The slips will add some extra cost, as if super-insulating a whole house were not expensive enough!

Interestingly, it appears that one could render the whole of a brick house such as ours under permitted development rules, but if you wish to add external insulation as well, a rendered finish would not be allowed. (Why?)

In my opinion, it should be the opposite way around - permitted development rules should not allow an uninsulated solid wall house to be rendered unless it is also insulated to a suitable level at the same time. This would ensure that thermal comfort and risk of fuel poverty are addressed when essential maintenance or aesthetic improvements are carried out.

Thursday, 24 February 2011

The plan so far - January 2011

Now that we’ve lived in our 1950’s 3 bed detached house for one year, much thought has gone into deciding what changes we’d like to make.

The “eco” wish-list includes:
• A generous porch on the front to minimise heat loss when entering/leaving the house.
• A utility room by the back door to create the same draught-lobby effect there.
• Super-insulate the loft conversion, the solid walls (externally) and the ground floor.
• Replace the single glazed windows with high quality timber framed windows (hopefully achieving a whole window u value <1, preferably 0.75)
• Ensure air tightness of 3m3/m2 at 50 pa pressure, or less than 1m3/m2 if possible
• Install a mechanical ventilation system with heat recovery (MVHR)
• Replace the ailing gas boiler with suitable means of space and water heating
• Installing low-flow devices to reduce water use
• Possibly add PV panels on the south-facing roof

In other words, we will apply to our house some of the principles which form the basis of the Passivhaus approach to building ultra-low energy homes.

The Passive House standard is for new buildings, but there is another standard which is specifically for existing buildings. This is the EnerPHit standard for Passive House retrofit. Houses built to this standard will use about 80-85% less heat and power than the average home.

This is the standard that we are aiming towards – although we don’t know yet just how close we might be able to get. To see a relatively recent description of this standard (a draft document), go to http://www.passiv.de/01_dph/Bestand/EnerPHit/EnerPHit_Criteria_Residential_EN.pdf

The really difficult question is “How far does it make sense to go, and what is within our budget?

Gas, Electricity and Water use in Year 1

We now have over 12 months of gas, electricity and water readings, taken on the same day every month so we can compare seasonal variations.

During the first winter (in Feb 2010), the gas boiler broke down for 2 weeks. This reduced the gas bill a little, but increased the electricity bill significantly as we brought in one electric heater so we could at least keep one room warm.

In a house like ours with an Energy Performance Certificate (EPC) rating of E and no eco-features at all, you might expect our annual gas, electric and water use to look something like this:

EPC/SAP estimated gas use - 32700 kWh
Average UK electricity use - 3500 kWh
Average UK water use - 140-150 litres per person per day

However, our actual use in 2010 was this:
Year 1 gas use - 21315 kWh
Year 1 electricity use - 1927 kWh
Year 1 water use - 94.5 cubic metres = 94,500 litres, or 64 litres per person per day

What this means is that we've reduced our bills significantly through being careful not to waste energy or water. In other words, we've done the "free" stuff. If we want to reduce energy and water use further we'll need to spend some money.

That said, I'm quite surprised how big the difference is between our actual use and the "UK average".

Our gas use is about 35% less than average for this kind of house as suggested by the Energy Performance Certificate (SAP calculation).
Our electricity and water use are approximately half of the UK average.

That's a lot of money and CO2 we're saving every year before we even start to make home improvements.

What's it like in its original state?

…and why would we wish to change it?

From June to August, it’s lovely if the weather is warm – quite cool inside generally. However, the west-facing rooms get really hot in the afternoon and the sun shines in our eyes.

In September, there’s a definite chill in the air – and not just outside. By the second half of September, the heating is very definitely on, and I start the morning ritual of wiping the windows from top to bottom and mopping up the puddles of water on the windowsill. Later in the day the condensation is back and I have to wipe it up again. If the weather is wet, we have laundry racks up in the lounge or dining room, and it takes over 24 hours to dry – which makes the condensation problem even worse.

Most of the wooden window frames have swollen over the last 59 years and can’t easily be opened or shut - to keep the heat in the windows are often closed anyway. The atmosphere is stuffy and uncomfortable and I dream every day of having a mechanical ventilation system with heat recovery bringing warmed fresh air in and taking away the stale damp air.

In October, I notice that the wooden window frames and the wallpaper around the window in the west-facing bedroom are gaining a growing patch of mouldy dots. The bathroom window frame (also west facing) is dreadful. I find drying the windows 3 or 4 times a day (to stop the condensation from pooling on the windowsill) is time-consuming enough without cleaning the frames and walls on a regular basis.

Last winter, shortly after moving in, we discovered that all the duvets stored in one wardrobe were wet from condensation running down the wall.

By late November it is cold and snowy – the coldest November for many years. It is harder than ever to get any part of the house to the right temperature. The hall always feels cold even when the lounge or dining room are too hot. And the kitchen only warms up properly if we are cooking. I’m forever adding and removing jumpers but never quite feeling comfortable. If we leave the doors open, cold air from the hall makes a warm room feel draughty. Once the heating goes off the temperature quickly drops.

December was also the coldest for many years. So far the boiler is holding out. Last winter it was out of action for 2 weeks (not an experience I wish to repeat), but apart from the occasional morning when we have to go out to the outhouse to get it going manually, all is going well so far. In fact, it has been so cold that the boiler runs constantly day and night, overriding the thermostat in the house. (This must be a feature that protects the boiler from extreme cold weather). Some rooms get too hot, and even the hall starts to feel almost comfortable, but it’s going to increase the gas bills this year.

These boilers in outhouses don’t seem very suitable for this kind of cold weather. What do people on low incomes do? Allow the heating system to override the thermostat and stay on to protect itself, running up a huge bill? Or switch it off altogether, live without heating and hot water, and pay for all the pipework to be mended when everything thaws?

January and February were slightly less cold than November and December this year, but the warm, dry weather in March and April came as a welcome change. A sunny spring afternoon makes the west-facing rooms nice and warm. Being able to hang the laundry to dry outside makes a big difference to humidity levels in the house, which of course reduces the need for heating too.

In May (and June), the heating is supposedly off, but if I get too cold it goes on again for a while. And the condensation on the windows is still present, but disperses during the morning (I refuse to wipe them dry – it seems as if I spent half the winter doing that).