Thursday 15 March 2012

Where would we be without expanding foam?

Now I know why lots of passive houses have nice simple roofs and gable ends - it's so much easier.

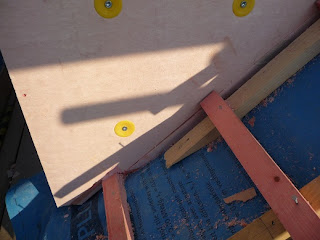
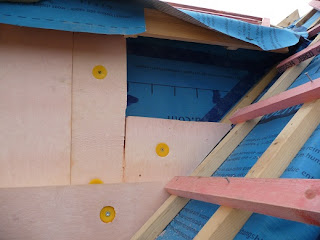
Here, we have the insulation above the rafters (hiding beneath the blue felt), meeting up with the first layer of wall insulation, and overlapped by the second layer of wall insulation. And any spare space between there and the last counterbatten is filled with expanding foam.


Helps with air tightness too.


Excess foam is trimmed off and that's it.


Insulating round the windows

To minimise cold bridging, the windows sit forward of the brickwork, in line with the first layer of insulation.
(These are EcoPassiv windows with an insulated wooden frame.)


Then the second layer of insulation overlaps the front of the window frame.


It's easy to do (if the insulation thickness matches the position of the window), effective, and makes a nice size window reveal.


One thing to keep in mind - inward opening windows like these go well with external insulation. The typical UK outward opening window could be restricted by insulation like this in some circumstances.


External insulation goes on the dormer

People tell me that energy efficiency and insulation are "un-sexy" and "boring" (while renewable technologies are apparently more exciting).

I beg to differ! It's great watching all this insulation going on (180mm of Phenolic foam boards) - and just thinking how nice and warm it is going to be!


The big thing about insulation is avoiding any gaps. Here, the wall insulation makes a perfect junction with the insulation above the rafters (100mm boards of Celotex directly under the blue felt layer).


At the top of the dormer walls is the junction with the dormer roof above. This is a trickier junction, but we think we've got it covered...


Looking down on the dormer walls from above... The space at the eaves (between the ends of the counterbattens) has been filled with a high grade mineral wool to enhance the junction where roof insulation meets wall insulation beneath.


Sunday 4 March 2012

Loft conversion taking shape

The super-insulated loft conversion is starting to look like a super-insulated loft conversion finally.


It will be a while before the insulation between the joists goes in - but with 100mm of Celotex above the rafters, it feels quite sheltered even without all the windows in yet.

The joins between boards of insulation have been taped on the outside, and will now be filled with foam on the inside to make sure that the insulation is continuous and air tight.


Roof progressing rapidly

All of a sudden the roof seems to be coming on in leaps and bounds - so fast we can hardly keep up!

The roof is now almost weather tight, with Fakro quadruple glazed window being fixed into place and taped up.


The front gable is also wrapped and taped. Be sure to employ a builder who can do origami!

Quite how air tight our very traditional but overly complicated roof structure will be when finished, I'm not sure. My best advice would be - buy a house with a simple up and down roof with gable at each end, or put in for planning to make the roof so! Avoid dormers, overhanging gables over bays, and so on!


The back gable is taking shape too - and we're finding that to be a much easier shape to make air tight and without cold bridges. It might not be that long before we have 180mm of insulation all up the back gable wall to join the insulation above the rafters.


It is looking increasingly unlikely that we'll be close enough to EnerPHit to be worth trying for certification. With the benefit of hindsight, there are various things we could have done some time back to make it easier.